Outside micrometers are easily one of the most common measuring tools in the machinist’s toolbox. They are so common that they are usually referred to as simply micrometers or mics. For the rest of this post, I will follow the same convention.
A side note, specialty micrometers such as depth micrometers or inside micrometers are more often referred to by their whole name.
Now that you are on a first name basis with your micrometer, let’s think about calibrating it.
So just how important is it to have a properly calibrated micrometer?
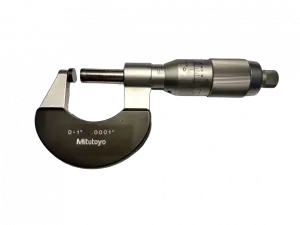
Considering a 0-1” micrometer is likely the most used inspection tool in the shop… pretty darn important.
Please note that some of what follows might be overkill for a hobbyist but it is certainly still good practice.
Now, let’s learn more about micrometer calibration.
Table of Contents
ToggleWhy do micrometers need to be calibrated?
Micrometers need to be calibrated to ensure their accuracy.
Because they are used for critical measurements, it is important to make sure that any readings taken with the micrometer are correct.
During the calibration process, the micrometer is checked with a standard, such as a gauge block, to verify it is accurate across its entire measuring range.
How often should you calibrate a micrometer?
There are many factors to consider when determining how often to calibrate your micrometer. The visual below lists some of the most common factors.

Micrometers can be calibrated at many different intervals. When setting the calibration frequency, you should take into account factors such as:
- How the tool will be used? Is the micrometer being used to measure critical product dimensions?
- How tight are the tolerances it will be used to measure?
- Will it be subjected to stresses such as heat, humidity, pressure, physical stress or other environmental?
- How much usage will it see?
- What is the tool’s past calibration history?
Where I work we take all of these factors into account and develop our calibration intervals based on them. We group tools into different intervals.
The most important tools are calibrated every four months or sooner. Less critical tools are calibrated on a yearly schedule. Occasionally, tools which see little use and have an excellent calibration history get calibrated at a more extended interval.
It all depends on what works for your shop. If you are unsure of where to start, calibrate more frequently and then adjust based on usage and calibration history over time.
Think about all of these factors when determining how often you will calibrate your micrometer.
What equipment do you need to calibrate a micrometer?
Calibration of your micrometer requires only a known length standard such as a gauge block, an adjustment spanner and your micrometer.
Additional supplies such as gage oil and task wipers will also come in handy but aren’t required.
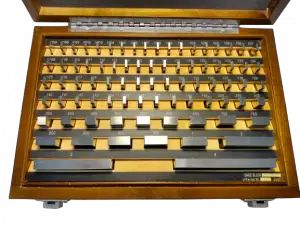
Gauge blocks should be chosen that are at a minimum four times more accurate than your micrometer.
If your micrometer reads to a tenth (.0001”) like most common micrometers, then you will need gauge blocks that are accurate to 25 millionths of an inch (.000025”).
This 4:1 requirement started with the military specification, or mil spec MIL-STD-45662. This specification defined the calibration requirements for companies.
This requirement is a minimum requirement. Using gauge blocks that are 10 times more accurate than the micrometer is even better.
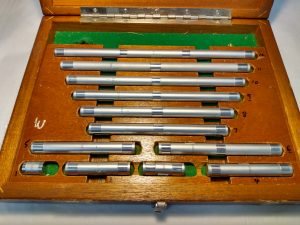
Note: For larger micrometers, length standards are often used in place of gage blocks.
Do I need to buy a micrometer that is already calibrated?
No, buying a micrometer that is already calibrated is not required.
In fact, I recommend not purchasing a micrometer that comes with a calibration certificate. The certification process costs extra and adds no extra value.
You will want to check the calibration of the tool once you get it anyways. Shipping companies aren’t always gentle and just because it was in calibration at the time of shipping does not ensure it is in calibration when received.
What do I need to maintain for calibration records?
At a minimum, your records should include calibration labels for your tools and a database where you record calibration information.
Free and printable calibration labels are available on our calibration labels page. All types of stickers are included for everything from tool calibration labels to do not use labels.
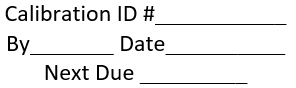
What information should the calibration label include?
Calibration labels should include at least the calibration date along with the next calibration due date. It is also a good idea to include the person who calibrated the tool and the tool #.
Note: It is acceptable to place a label on the box of a measuring tool if it isn’t practical to place on the tool such as is the case with a set of gauge blocks.
What information should be included in the calibration database?
The calibration database can come in many forms. Card systems, spreadsheets, database files and specialty programs are often used to maintain calibration records.
The following information should be recorded in the calibration database:
- Who performed the calibration
- Date calibration was performed
- Master standard that was used for calibration
- Calibration checks to be performed
- Acceptable limits for calibration checks
- Actual readings from the calibration checks
- Next calibration due date
While it isn’t always a strict requirement, it is a good idea to think about recording the environmental conditions such as temperature and humidity when performing your calibration.
Example calibration procedure for a micrometer
- Read the entire procedure before beginning calibration
- If at any time in the calibration procedure a problem is identified, the problem will be corrected and the process will start over. If the problem can not be fixed, the micrometer will be taken out of service.
- Clean anvil and spindle faces along with all exterior surfaces.
- Inspect the micrometer for any damage or issues which might prevent accurate calibration.
- Close the micrometer using ratchet or friction stop if present.
- Hold the micrometer up to light and visually examine. If faces are not parallel, light will show between them. There should be no light visible between the faces of the anvil and spindle.
- Remove the spindle assembly.
- Clean and oil spindle and measuring screw.
- Reassemble the micrometer.
- Check measuring screw for wear by pushing thimble in and out. Do this in the direction of the measuring screw axis. There should be no movement.
- Close the micrometer by using the ratchet or friction stop if present to check the zero setting.
- Check accuracy with gage block(s) having accuracy not less than 0.000025 inch. Verify measurements at sizes that are not even intervals. Use sizes such as .206”, .456” or .784”. Avoid common sizes such as .250”, .500” and .800”. Verifying sizes that are not even increments of .025” will verify the scale around the micrometer.
- Place block or block combinations between anvil and spindle of the micrometer and close the micrometer using ratchet or friction stop if present. Use block combinations to check the accuracy of the instrument positions across the total measuring range.
- Record all above readings in the calibration database.
Steps 8 and 9 are not required but are good preventative maintenance for your tool.
Related articles
For more information check out these related articles: